


Instructions for mounting and changing the refill
Glue holder

- Contents: Self-adhesive holder / Alcohol wipe / key to unlock the refill
- Before installing the holder, wipe the surface with an alcohol wipe.
- The area where you want to mount the holder should be:
• firm and dust-free
• Clean and dry (no dirt, grease, oil, silicone film or other impurities) - Remove the protective film from the adhesive tape on the holder. < / li>
- Attach the holder at least 8 cm away from the sink to provide enough space to change the refill.
- Hold the dispenser upright and press it firmly against the wall.
- Holder do not place over grouting lines, as the effect of the adhesive will be reduced.
IMPORTANT: DO NOT apply the refill for the first 48 hours to allow the adhesive to work.
Drilling holder
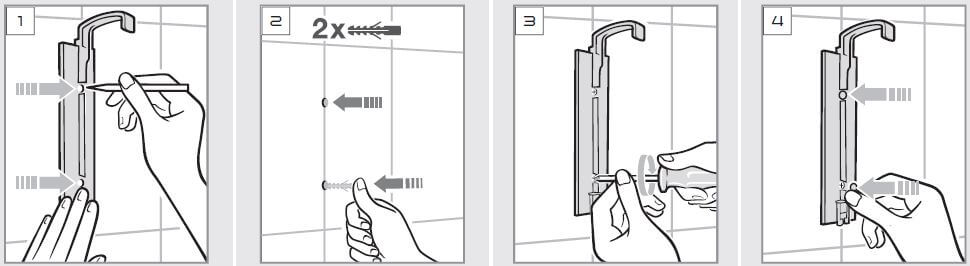
- Mark the positions for the two screw holes on the wall.
- Drill the two screw holes and insert the dowels.
- Insert the supplied screws through the holes in the bracket and secure the dispenser to the wall.
- Now place the screw caps over the screws on the mounted bracket.
- Contents: bracket / Alcohol wipe / key to unlock the refill / screws, screw / screw caps.
REFILL REPLACEMENT
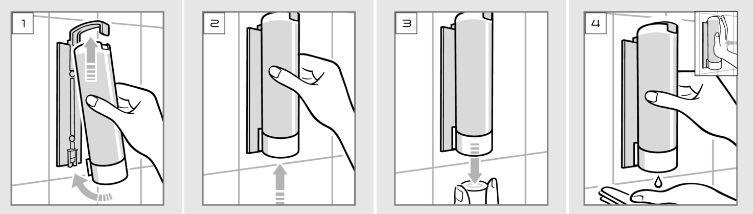
- Hold the refill upside down with the lid facing down and place it under the holder.
- There is a slot in the holder that directs the refill to an upright position. A slight click will notify you that the refill is firmly in place.
- Remove the transport protective cover from the valve before first use.
- Press the refill until you reach the desired amount of contents.
< li style = "list-style-type: none;">